Windows Phone - Fancy Geometric Background Control
February 19, 2014Geometric backgrounds are quite popular today, since they usually play quite well with flat and simplistic UIs that dominate current user experiences. If you are not sure what I am after here, just Google this term with Bing and you will get the idea.
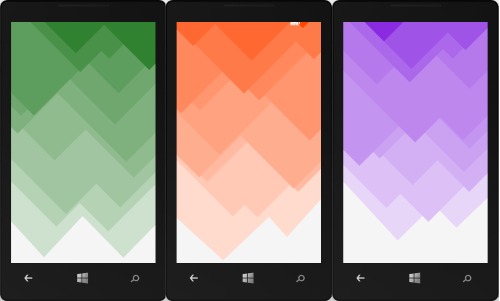
Since I am currently working an a Windows Phone App, where this type of background fits in nicely, is decided to create a custom control for it. Here are a couple of screenshots of what this control looks like in action.
The control is basically configured by one parameter of type Color.
<n:FancyBackground Color="OrangeRed" />
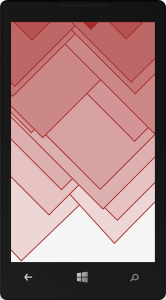
Another property which can be set is the LineThickness of the triangular shapes. It’s default value (like in the screenshots above) is “0”, but here is how a line thickness of “3” looks like:
<n:FancyBackground LineThickness="3" Color="Brown" />
The geometric background effect is basically created using a couple of triangular shapes that are placed bottom to top together with a random displacement. The triangles’ color is calculated from the given base color property and made lighter, the further we come to the bottom of the control. “Lightening” the color is achieved by simple linear interpolation (aka lerping) between the given color and the “White” color (#FFFFFF).
Lerping
Here is the code in form of an extension method that performs linear interpolation (lerping) between two colors. If the color we interpolate towards is “White” we achieve the nice lightening effect our custom control is using.
public static Color Lerp(this Color fromColor, Color toColor, double amount)
{
  var r = (byte)Lerp(fromColor.R, toColor.R, amount);
  var g = (byte)Lerp(fromColor.G, toColor.G, amount);
  var b = (byte)Lerp(fromColor.B, toColor.B, amount);
  return Color.FromArgb(255, r, g, b);
}

private static double Lerp(double start, double end, double amount)
{
  var difference = end - start;
  var adjusted = difference * amount;
  return start + adjusted;
}
Easing
Even though the color interpolation is linear, I figured that the actual percentage of the lightening factor (the amount argument) looks better if we apply exponential easing to it.
In other words: The triangles becoming darker from bottom to top does not happen on a linear but on a exponential scale.
The easing function I am using is taken from Golan Levin’s website Flong and is a double-exponential seat. I am currently using a control parameter of 0.40, but feel free to modify and play with this value. Here is the C# code for this easing function.
double ExponentialEase(double x, double a)
{
  var epsilon = 0.00001;
  var minA = 0.0 + epsilon;
  var maxA = 1.0 - epsilon;
  a = Math.Max(minA, Math.Min(maxA, a));
  var y = 0.0;
  if (x <= 0.5)
  {
    y = (Math.Pow(2.0 * x, 1 - a)) / 2.0;
  }
  else
  {
    y = 1.0 - (Math.Pow(2.0 * (1.0 - x), 1 - a)) / 2.0;
  }
  return y;
}
The rest of the code just deals with creating triangular shapes and randomly placing them on the control starting on the bottom up to the top. Here is all the source code for it:
using System;
using System.Windows;
using System.Windows.Controls;
using System.Windows.Media;
using System.Windows.Shapes;

namespace Newport
{
  public class FancyBackground : Control
  {
    private Canvas _canvas;
    private bool _isInitialized;

    public FancyBackground()
    {
      DefaultStyleKey = typeof(FancyBackground);
      Loaded += (_, __) => CreateItems();
    }

    public override void OnApplyTemplate()
    {
      _canvas = (Canvas)GetTemplateChild("canvas");
      _isInitialized = true;
      base.OnApplyTemplate();
    }

    private void CreateItems()
    {
      if (_isInitialized)
      {
        _canvas.Children.Clear();
        const int steps = 10;
        steps.Times(i =>
        {
          var div = ActualWidth / 2;
          CreateTriangle(div * 0, div * 1, i, steps);
          CreateTriangle(div * 1, div * 2, i, steps);
        });
      }
    }

    private void CreateTriangle(double w0, double w1, int i, int steps)
    {
      var stepX = (ActualHeight * 0.1) * (steps / (steps + i));
      var stepY = ActualHeight / steps;
      var xM = RandomData.GetDouble(w0, w1);
      var yM = ActualHeight - i * stepY - RandomData.GetDouble(1.5 * stepY);
      var xTL = xM - (yM + RandomData.GetDouble(-stepX, stepX));
      var xTR = xM + (yM + RandomData.GetDouble(-stepX, stepX));
      var yT = 0;
      var p = new Path();
      p.Data = new PathGeometry
      {
        Figures = new PathFigureCollection()
        {
          new PathFigure
          {
            IsClosed = true,
            StartPoint = new Point(xM, yM),
            Segments = new PathSegmentCollection()
            {
              new LineSegment { Point = new Point(xTL, yT) },
              new LineSegment { Point = new Point(xTR, yT) },
            }
          },
        }
      };
      var l = 1 - (i + 1.0) / steps; // lightness percentage
      l = ExponentialEase(l, 0.40);
      var col = Color.Lerp(Colors.White, l);
      p.Fill = new SolidColorBrush(col);
      p.Stroke = new SolidColorBrush(Color);
      p.StrokeThickness = LineThickness;
      _canvas.Children.Add(p);
    }

    public static readonly DependencyProperty ColorProperty =
      DependencyProperty.Register(
      "Color",
      typeof(Color),
      typeof(FancyBackground),
      new PropertyMetadata(Colors.Green, OnColorChanged));

    public Color Color
    {
      get { return (Color)GetValue(ColorProperty); }
      set { SetValue(ColorProperty, value); }
    }

    private static void OnColorChanged(DependencyObject sender, DependencyPropertyChangedEventArgs args)
    {
      ((FancyBackground)sender).CreateItems();
    }

    public static readonly DependencyProperty LineThicknessProperty =
    DependencyProperty.Register(
    "LineThickness",
    typeof(double),
    typeof(FancyBackground),
    new PropertyMetadata(0.0, OnLineThicknessChanged));

    public double LineThickness
    {
      get { return (double)GetValue(LineThicknessProperty); }
      set { SetValue(LineThicknessProperty, value); }
    }

    private static void OnLineThicknessChanged(DependencyObject sender, DependencyPropertyChangedEventArgs args)
    {
      ((FancyBackground)sender).CreateItems();
    }
  }
}
Since I implemented this control as a custom control, the XAML resides in a Generic.xaml file in the Themes folder. Here is what it looks like:
<ResourceDictionary
  xmlns="http://schemas.microsoft.com/client/2007"
  xmlns:x="http://schemas.microsoft.com/winfx/2006/xaml"
  xmlns:n="clr-namespace:Newport">

  <Style TargetType="n:FancyBackground">
    <Setter Property="Template">
      <Setter.Value>
        <ControlTemplate TargetType="n:FancyBackground">
          <Canvas
            x:Name="canvas"
            Background="WhiteSmoke" />
        </ControlTemplate>
      </Setter.Value>
    </Setter>
  </Style>
</ResourceDictionary>
You might be wondering about the Newport namespace. This is the name of my Windows Phone / WinRT application development / MVVM framework. I will soon publish it on GitHub and create a couple of blog posts on how to use it.

